How do you go about publishing multiple videos in a player with a video archive?
In Streamio, there are two players that can be embedded on any website. The default player is used to embed a specific movie on a page. The archive player is used to add a video player that contains more movies to a playlist, as well as more playlists with different movies.
To publish multiple movies to an archive player, the following steps need to be performed:
A playlist is, as the name suggests, a collection of movies. To collect and view movies in a video archive, you must create a playlist and specify which movies to include in the playlist.
Playlists are built using so-called smart tags. When you include a tag in a playlist, such as “Seminar,” all the movies in your library that you labeled “Seminar” will be automatically downloaded and included in your new playlist.
Of course, you can enter multiple tags in a playlist, including several different movies.
Creating a playlist is very simple:
Now, all movies marked with the tags you specified above will be included in your new playlist.
If you find that a specific movie isn’t downloaded to your playlist: Go back to your video library.
Click the title of the movie you want to be included in your playlist.
Check the spelling of the tags for the movie or enter the appropriate tag if the movie has no tags.
Go back and make sure that your movie has now been picked up and included in the playlist.
In this article, we’ll show you how to easily create a player for your video archive using one of our templates:

You are now directed to the page where you can create your own player:
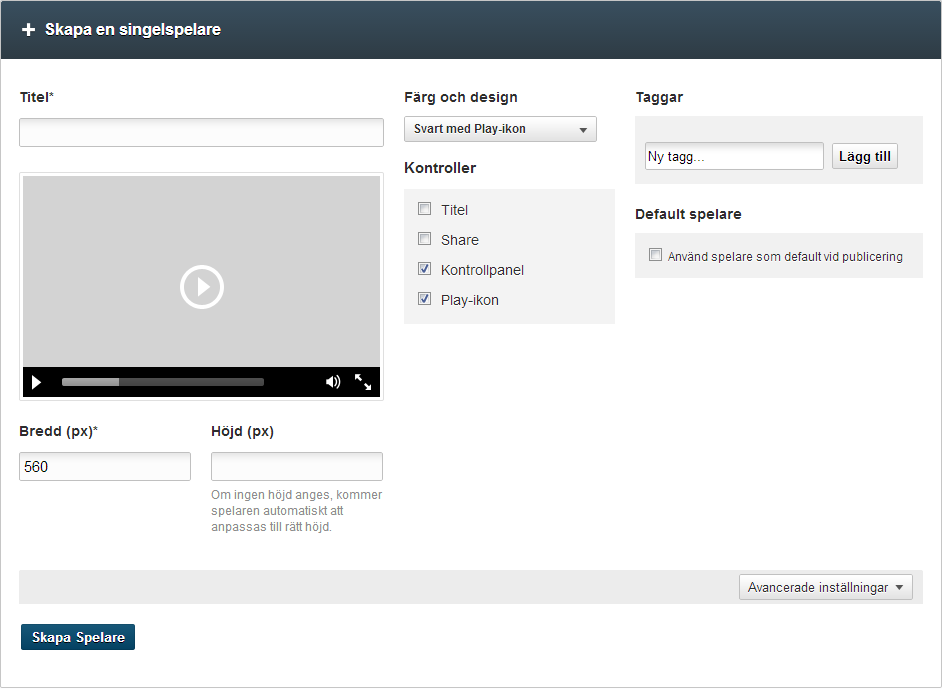
Here’s how to create your own player:
title
By enabling “Title”, the title of the video you posted will appear at the top of the player.
Share
By enabling “Share”, you enable visitors to share the video on other channels such as social media such as Facebook, Twitter, via email or as a link you can share anywhere.
Show “Play” icon
By activating this feature, a large “Play” icon will be made visible before and after the end of playback.
Player features
By enabling “Control Panel”, visitors can start/pause playback, see where in the video they are, flush/jump in the video, raise/lower the sound, and choose whether to watch the movie in full screen.
Under “TAGS“, you can add one or more smart tags to your player, these are mainly used when developers integrate Streamio with other systems.
If you activate “DEFAULT PLAYER“, the player you are now creating will become your own standard player, i.e. the player that appears at the top of the list of available players when you publish a video.
When you are done, all you have to do is press the blue “Create Player” button and then it is done! Your player will now be found in their player library, ready to be used.
Changes are made to published videos
Note that changes made to a player used for publishing on a website will take effect directly on previously published videos. So you don’t have to go in and make changes to the already published link. An exception below:
Note! If you resize a player posted on a website and want it to make an impact on previously published videos with that player, you’ll need to manually update the published link. (This is because the size is specified in the html code of the object < iframe > , not in the player itself)
To publish your video archive, you must first connect one or more playlists to the archive player you created for your video archive:
Go to your library and click on “PLAYER”.
Click the title of the player you want to use for your video archive. Archive players are marked with the File Player icon
There you will find a section on the page called “MANAGE PLAYLISTS”.

This section contains a menu with a list of all the playlists you created. If there are no playlists, you must first create a playlist, see Create a playlist.
To connect one or more playlists to this video archive, select only the playlists you want from the menu and click “Add“.
If the archive player is based on a default template, the title of the playlists appears as selectable “channels” at the top of the video archive. To hide the channel view, you must select Custom Archive Player and make an addition to the CSS code, see article CSS Video Archive – Hide playlist title
Note! If you add multiple playlists to your archive, it’s important that you add them in the order you want them to appear in your video archive.
Click the Update Player button to save the settings.
Once you’re up to date, you can easily preview the results by clicking the green “Preview” button at the bottom of the page.
Changes are made to published videos
Note that changes made to an archive player used for publishing to a website take effect directly on previously published videos. So you don’t have to go in and make changes to the already published link. An exception below:
Note! If you resize a player posted on a website and want it to make an impact on previously published videos with that player, you’ll need to manually update the published link. (This is because the size is specified in the html code of the object < iframe > , not in the player itself.)
Publishing a video archive is as easy as publishing a single movie:
At the bottom of the page you will find a section titled “PUBLISH”:

To preview the player before publishing, press the green“Preview”button.
Copy the code for publishing to Web sites (Ctrl +C) and insert it (Ctrl + V) in the location on your Web page where you want the video to appear.
Then, when you publish your web page, the video archive will be found where you entered the code snippet.
Direct link
Note! If you want a URL for the movie (for example, to send it by SMS), you should instead copy and paste the URL located under the heading “Direct link”.